Criterion C: Creating the Solution
(i) Construct a logical plan that describes the efficient use of time and
resources, sufficient for peers to be able to follow to create the solution. pages 1- 2
By the end of year 4 you should be able to:
Step
Description of the tasks
Duration
Resources required
Place/Venue
1
Create background.
I will design my background to show the color scheme of the client's organisation of blue and yellow colors.
1 hour
Animation software:
animaker.com
In class
2
Create props to show the different furniture; counter, fridge, cashier desk and shelves
50 min
animaker.com
In class
3
4
5
6
Objective C strand 1
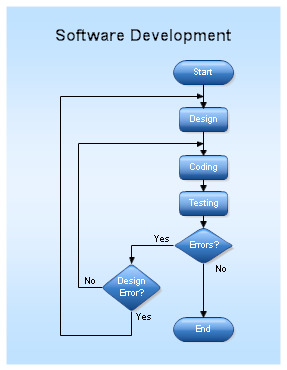
In objective C, your role switches from designer to prototype-developer or manufacturer. Objective C
focuses on the realization or creation of a solution to a problem.
One of the most difficult aspects of design is to take an idea from paper and create a product that someone can interact with: a solution to a problem. In objective B, you developed planning drawings and/or diagrams to clearly depict what you are making. In this first strand of objective C, you detail how they will make your solution.
By constructing a logical plan that details the steps required to make a solution, you will demonstrate your knowledge and understanding about how solutions can be made.
Step
|
Description of the tasks
|
Duration
|
Resources required
|
Place/Venue
|
1
|
Create background.
I will design my background to show the color scheme of the client's organisation of blue and yellow colors. |
1 hour
|
Animation software:
animaker.com |
In class
|
2
|
Create props to show the different furniture; counter, fridge, cashier desk and shelves
|
50 min
|
animaker.com
|
In class
|
3
| ||||
4
| ||||
5
| ||||
6
|
Objective C strand 1
focuses on the realization or creation of a solution to a problem.
One of the most difficult aspects of design is to take an idea from paper and create a product that someone can interact with: a solution to a problem. In objective B, you developed planning drawings and/or diagrams to clearly depict what you are making. In this first strand of objective C, you detail how they will make your solution.
By constructing a logical plan that details the steps required to make a solution, you will demonstrate your knowledge and understanding about how solutions can be made.
What are resources?
Resources can be categorized in two ways: materials and tools.
It is simple to identify tangible materials such as hardwood or nylon; however, it can become more problematic to determine digital materials. When identifying digital materials, you should consider text, fonts, images, audio, video, animation, sprites and icons.
For digital design, tools include both software and hardware (input, processing and output devices). For product design, tools include: hand tools, machinery, CAD (Computer Aided Design) software, EDA Electronic Design Automation software (EDA) (e.g. Fritzing) and CAM hardware (e.g. Fritzing Fab).
Quality control and assurance
Quality assurance covers all materials from design to documentation. It includes the regulation of quality of raw materials, assemblies, products and components, services related to production and management, and inspection processes.
Quality control manifests itself in the development checking and testing of systems to ensure that products or services are designed and made to meet or exceed specifications.
Quality control manifests itself in the development checking and testing of systems to ensure that products or services are designed and made to meet or exceed specifications.
Examples of plans
Step-by-step plan
Step Process (including quality control, health and safety considerations) Tools Materials Time to complete 1 2
Step-by-step plan template

Gantt chart/slippage chart
A Gantt chart is a project-management tool used to provide an overview of a process. A Gantt chart divides the manufacture of a product into small tasks. It indicates the time estimated for each of these tasks and the resources required. It does not provide a detailed set of instructions, but instead is an overview to self-assess progress with a project. You should indicate when each task is complete.

Gantt chart example
A slippage chart goes one step further than the Gantt chart in that it has room below each task to mark when it was completed (in green), allowing you to identify when they are behind in their plans and take action to get back on schedule.
 Slippage chart example
The following questions can help you consider your planning.
- Does your plan contain a sequence of logical steps?
- Is the use of resources explained clearly?
- Have you made sure you have enough time to complete your product?
- Have you given time for practising or learning a new skill?
- Have you allowed extra time in case something goes wrong?
- Have you considered alternative ways of creating the solution?
- Have you planned for testing at appropriate times in the manufacturing process?
Step-by-step plan
| Step | Process (including quality control, health and safety considerations) | Tools | Materials | Time to complete |
| 1 | ||||
| 2 |
Step-by-step plan template

Gantt chart/slippage chart
A Gantt chart is a project-management tool used to provide an overview of a process. A Gantt chart divides the manufacture of a product into small tasks. It indicates the time estimated for each of these tasks and the resources required. It does not provide a detailed set of instructions, but instead is an overview to self-assess progress with a project. You should indicate when each task is complete.


The following questions can help you consider your planning.
- Does your plan contain a sequence of logical steps?
- Is the use of resources explained clearly?
- Have you made sure you have enough time to complete your product?
- Have you given time for practising or learning a new skill?
- Have you allowed extra time in case something goes wrong?
- Have you considered alternative ways of creating the solution?
- Have you planned for testing at appropriate times in the manufacturing process?
(ii) Demonstrate excellent technical skill when making the solution
At the end of year 4 you should be able to: ( strand 2 and 3. 6 Pages)
To determine the correct level of technical skill which you are operating at, teachers need to consider the complexity of skill demonstrated as well as the level of guidance that the teacher needs to provide in order for you to complete the task.
When determining the complexity of skill demonstrated by you, a number of indicators will be considered.
- Accuracy of the solution: Have all parts been made as detailed in the plan? Have all parts been made accurately?
- Final aesthetic quality of the solution: Has the student given appropriate attention to detail, considering the final overall look and feel of the solution?
- Assembly of the solution: Do all components fit together or combine as detailed in the plan?
When determining the level of guidance and support needed, teachers will consider that you:
- can be given initial guidance and demonstrations by the teacher
- can practise the processes as required
- must work independently when making the solution, if they are to achieve the higher levels
- should demonstrate safe working practices.
For digital design, the level of technical skill demonstrated can be shown through the functionality of the assembled solution. For product design, the level of technical skill demonstrated can usually be shown through the functionality and the final finish of the assembled solution.
By the end of year 4 you should be able to:
You will demonstrate that the planning process was sufficiently thorough if the final product matches the planning drawing and no changes were made to the plan, in whatever form it was presented. If the drawings/diagrams and the plan match what has been made, then you have followed the plan.
If a you do not follow the plan, it will usually result in the solution not fully meeting the specification and/or matching the design detailed in the drawings/diagrams.
At the end of year 4 you should be able to: ( strand 2 and 3. 6 Pages)
To determine the correct level of technical skill which you are operating at, teachers need to consider the complexity of skill demonstrated as well as the level of guidance that the teacher needs to provide in order for you to complete the task.
When determining the complexity of skill demonstrated by you, a number of indicators will be considered.
- Accuracy of the solution: Have all parts been made as detailed in the plan? Have all parts been made accurately?
- Final aesthetic quality of the solution: Has the student given appropriate attention to detail, considering the final overall look and feel of the solution?
- Assembly of the solution: Do all components fit together or combine as detailed in the plan?
- can be given initial guidance and demonstrations by the teacher
- can practise the processes as required
- must work independently when making the solution, if they are to achieve the higher levels
- should demonstrate safe working practices.
By the end of year 4 you should be able to:
You will demonstrate that the planning process was sufficiently thorough if the final product matches the planning drawing and no changes were made to the plan, in whatever form it was presented. If the drawings/diagrams and the plan match what has been made, then you have followed the plan.
If a you do not follow the plan, it will usually result in the solution not fully meeting the specification and/or matching the design detailed in the drawings/diagrams.
(iv) Fully justify changes made to the chosen design and plan when making the solution
By the end of year 4 you should be able to: Pages 2 or 3 minutes Video.
As you implement your plans, you will often come to a point where you will have to modify the plan or the design. You will need to ensure that you detail and justify any changes that you make during the creation process.
If you do not make any changes to your product or plan, this strand does not have to be addressed with evidence. However, if any changes are made, you must address this strand.
There are two main changes and modifications I have made to my original idea:
- The hole on the edge of the small wooden pieces (used for the numbers) used to help lift the pieces was originally a square of dimensions 15mm x15mm. Nevertheless, I have found a better solution that is easier to create and is more practical. I will instead create a circle of radius 10mm. This will be done using a bench drill which is easier and faster than cutting it in a square shape using a saw, especially since I will be creating 20 pieces of these.
- In the original plan, the snake was supposed to be painted on the top 600 x 420mm wooden piece, with the holes for the number pieces being in it. Nevertheless, I have found a better solution which is to cut out the snake (with the dimensions listed in the ‘Parts list’ page) and create the holes in the snake itself. This would not only make the product more attractive, it would additionally make its creation more practical and easier since it would be easier to rotate the snake than the whole board when creating the holes.
Changes made to design example: Educational toy
On the home page…
The link has moved from the very bottom to almost near the top, I had done this for aesthetical reasons. The quote, instead of having it centered, it is now flushed right, this was because I needed to create more of a visual balance. Other than that, it appears the same in the design as it does in the final product.
Design Solution


Changes made to design example: Website

Changes made to design example: Making a box
Modification to my Design
Now that I have made a plan to follow and thought about all the materials, tools I am going to use and how much time the project is going to take, some features of my design changed.
- To start with, I changed the thickness of the circle of the sun which is where I am going to locate the clock mechanism. This is because the part of the clock mechanism that has to be drilled through the material is 6cm long. So, it is going to take a long time to drill a whole about 14cm deep on an 18cm thick material. I thought it would take less time drilling a whole about 2 cm deep on an 8cm thick material
- Now that I thought about how long it is going to take to create stickers, I decided make more Number Stickers. Before I made the plan, I thought it would take the longest time to create the stickers on the vinyl cutter; however, I realized it actually doesn’t. I was going to only make four stickers: 12, 3, 6 and 9. But, since it doesn’t take so much time creating them, I decided to make all twelve stickers. I also realized that while I am waiting for the stickers to be cut out by the vinyl cutter, I could be using the time and start working on the next step which is putting the clock mechanism on to the clock design.
- The last change I have made is to use spray paint for one or two parts. If I use paint, I have to paint several coats and dry them. Same goes for spray paint; however, if you compare the time on how long it takes to paint and spray a material once, to spray paint takes less time.
Modifications to a design example
By the end of year 4 you should be able to: Pages 2 or 3 minutes Video.
As you implement your plans, you will often come to a point where you will have to modify the plan or the design. You will need to ensure that you detail and justify any changes that you make during the creation process.
If you do not make any changes to your product or plan, this strand does not have to be addressed with evidence. However, if any changes are made, you must address this strand.
There are two main changes and modifications I have made to my original idea:
|
Changes made to design example: Educational toy
| On the home page… The link has moved from the very bottom to almost near the top, I had done this for aesthetical reasons. The quote, instead of having it centered, it is now flushed right, this was because I needed to create more of a visual balance. Other than that, it appears the same in the design as it does in the final product.
Changes made to design example: Website |


Changes made to design example: Making a box
|
(iv)(a) Present the solution as a whole
At the end of year 5 you should be able to:
A digital design product will be presented as either an executable file or readable file.
A digital design product will be presented as either an executable file or readable file.
Task strands/Objectives.
- Construct a detailed and logical plan, which describes the efficient use of time and resources,
sufficient for peers to be able to follow to create the solution. The plan should be detailed.
- Create the product that demonstrates excellent technical skills usage. Be proficient and produce
an outstanding product that meets the design specs. It's expected that a dated process journal is kept
with detailed screenshots showing the progress of your creating stage.
- In this stage, there should be clear evidence that the plan is followed consistently, the final product
should meets the design specifications and should be a close as possible to your chosen
design, and that the solution functions as intended and is presented appropriately.
-fully justify changes made to the chosen design and plan when making the solution
a. present the solution as a whole.
It's expected that a dated process journal is kept with detailed screenshots justifying any
improvements in your product development progress. The screenshots will normally show
how a particular complex techniques are applied before and after.
N/B:
1.
- Gantt Chart.- Summarizes your design plan.
1.
Step
|
Description of the tasks
|
Duration
|
Resources required
|
Place/Venue
|
1
|
Create background.
I will design my background to show the color scheme of the client's business of blue and yellow colors. |
1 hour
|
Animation software:
animaker.com |
In class
|
2
|
Create props to show the differnt furniture; counter, fridge, cashier desk and sheleves
|
50 min
|
animaker.com
|
In class
|
3
| ||||
4
| ||||
5
| ||||
6
|
- Gantt Chart.- Summarizes your design plan.
Gantt charts illustrate the start and finish dates of the terminal elements and summary elements
of a project.
- screenshots.
-Date
-Time
-Duration
-Detailed description and annotation.
Task:
Your challange during the break, is to continue with your Criterion C: Creating the Product at home and document your progress in
in your dated Process Journal. Your product is due for submission on the first week of November
Task:
Your challange during the break, is to continue with your Criterion C: Creating the Product at home and document your progress in
in your dated Process Journal. Your product is due for submission on the first week of November
Assessment Criteria
Criterion C: Creating the solution
| |
0
|
The student does not reach a standard described by any of the descriptors below.
|
1 — 2
|
The student demonstrates minimal technical skills when making the solution, creates the solution, which functions poorly and is presented in an incomplete form.
|
3 — 4
|
The student constructs a plan that contains some production details, resulting in peers having difficulty following the plan, demonstrates satisfactory technical skills when making the solution, creates the solution, which partially functions and is adequately presented, outlines changes made to the chosen design and plan when making the solution.
|
5 — 6
|
The student constructs a logical plan, which considers time and resources, sufficient for peers to be able to follow to create the solution, demonstrates competent technical skills when making the solution, creates the solution, which functions as intended and is presented appropriately, describes changes made to the chosen design and plan when making the solution.
|
7 — 8
|
The student constructs a detailed and logical plan, which describes the efficient use of time and resources, sufficient for peers to be able to follow to create the solution, demonstrates excellent technical skills when making the solution., follows the plan to create the solution, which functions as intended and is presented appropriately, fully justifies changes made to the chosen design and plan when making the solution.
|


